Ansible Configuration Templating
using a Database (Part1)
You have started using Ansible for Configuration Templating, but you have realized that maintaining the information on hundreds of network devices in YAML is...let's just say, suboptimal.
You could fall back to Excel, but then you would have to figure out how to programmatically extract this information. Additionally, using Excel might create redundant network inventory sources—with part of the information in Excel and part in your network inventory system.
What you would like to have is a manageable, programmable way of storing this network device information.
One solution to this problem is to use Ansible's dynamic inventory and a database. In practice, the database would probably be your existing inventory system (and you would be programming against it to extract the information that you require).
In this series of articles, I am going to work through generating four Arista vEOS switch configurations from a database. This will include the global configuration and the individual switchport configurations.
So let's dive in...
Defining the Database
In my environment I am using Django's ORM (object relational mapper). Django's ORM allows me to use classes/objects/methods to interact with the database. In other words, it is standard Python programming (you do not have know or use any SQL). Additionally, the ORM provides significantly improved security and a consistent interface (in other words, you can change the backend database without having to modify your application code).
Note, I am going to intentionally omit some of the Django configuration steps. These steps are well documented in the Django documentation.
Now, how do you define the information that you want to store in the database? You do this by creating Django model definitions (which are specified in the Django models.py file). Below is the models.py file that we will be using:
from django.db import models

class Credentials(models.Model):
    username = models.CharField(max_length=50)
    password = models.CharField(max_length=50)
    description = models.CharField(max_length=200, blank=True, null=True)

    def __unicode__(self):
        return u'%s' % (self.username)

class InventoryGroup(models.Model):
    group_name = models.CharField(primary_key=True, max_length=80)
    def __unicode__(self):
        return u'%s' % (self.group_name)

class NetworkSwitch(models.Model):
    device_name = models.CharField(primary_key=True, max_length=80)
    device_type = models.CharField(max_length=50)
    ip_address = models.IPAddressField()
    management_ip = models.IPAddressField()
    port = models.IntegerField()
    vendor = models.CharField(max_length=50, blank=True, null=True)
    model = models.CharField(max_length=50, blank=True, null=True)
    os_version = models.CharField(max_length=100, blank=True, null=True)
    serial_number = models.CharField(max_length=50, blank=True, null=True)
    uptime_seconds = models.IntegerField(blank=True, null=True)
    credentials = models.ForeignKey(Credentials)
    group_name = models.ForeignKey(InventoryGroup)

    def __unicode__(self):
        return u'%s' % (self.device_name)

class SwitchPort(models.Model):
    mode_choices = (
        ('access', 'access'),
        ('trunk', 'trunk'),
    )
    lag_mode_choices = (
        ('active', 'active'),
        ('passive', 'passive'),
        ('on', 'on'),
    )
    port_name = models.CharField(max_length=50)
    mode = models.CharField(
        max_length=10,
        choices=mode_choices,
        default='access'
    )
    access_vlan = models.PositiveIntegerField(blank=True, null=True)
    trunk_native_vlan = models.PositiveIntegerField(
        blank=True,
        null=True,
        default=1
    )
    trunk_allowed_vlans = models.CharField(
        max_length=200,
        blank=True,
        null=True,
        default='all'
    )
    lag_enabled = models.BooleanField(default=False)
    lag_mode = models.CharField(
        max_length=10,
        choices=lag_mode_choices,
        blank=True,
        null=True
    )
    lag_group = models.PositiveIntegerField(blank=True, null=True)
    network_switch = models.ForeignKey(NetworkSwitch)

    def __unicode__(self):
        return u'%s:%s' % (self.network_switch.device_name, self.port_name)
Now there is obviously quite a bit of information specified here.
Let's first look at the NetworkSwitch class:
class NetworkSwitch(models.Model):
    device_name = models.CharField(primary_key=True, max_length=80)
    device_type = models.CharField(max_length=50)
    ip_address = models.IPAddressField()
    management_ip = models.IPAddressField()
    port = models.IntegerField()
    vendor = models.CharField(max_length=50, blank=True, null=True)
    model = models.CharField(max_length=50, blank=True, null=True)
    os_version = models.CharField(max_length=100, blank=True, null=True)
    serial_number = models.CharField(max_length=50, blank=True, null=True)
    uptime_seconds = models.IntegerField(blank=True, null=True)
    credentials = models.ForeignKey(Credentials)
    group_name = models.ForeignKey(InventoryGroup)
With this class, I have defined a database table; the class is based on Django's 'models.Model'. So, each object of this class will generally correspond to a database entry; each object will also have certain attributes (for example, device_name, ip_address, vendor). These attributes will correspond to fields in the database. Basically, you will create NetworkSwitch objects and then save these objects to the database. You can then retrieve, modify, and delete these objects. Some of the attributes are optional; the optional attributes are indicated by "blank=True, null=True".
Now, the NetworkSwitch class does have a few special fields. First, you can see that 'device_name' is the 'primary_key'. This means that the each NetworkSwitch database entry must have a unique device_name. Additionally, you can see that both the 'credentials' and 'group_name' fields are specified as being foreign keys. A foreign key is a way of establishing a relationship between objects.
In our example, we will have four Arista switches. Consequently, we will have four NetworkSwitch objects. Now these four Arista switches use the exact same username and password. Instead of specifying this username and password four times (or a hundred times if you had more switches), we create it once as Credentials object. We then link the NetworkSwitch objects to the Credentials object using a foreign key.
Here is the definition for the Credentials class:
class Credentials(models.Model):
    username = models.CharField(max_length=50)
    password = models.CharField(max_length=50)
    description = models.CharField(max_length=200, blank=True, null=True)

    def __unicode__(self):
        return u'%s' % (self.username)
There is a similar foreign key relationship for the InventoryGroup. The InventoryGroup just specifies a group that the switches belong to (in our example, this group is just named 'arista').
Now besides the NetworkSwitch, Credentials, and InventoryGroup classes, there also is a SwitchPort class. This class is where the characteristics of all of the individual switchports are specified. This class defines the switchport mode (access or trunk), the access VLAN, the trunk native VLAN, and whether there is a link aggregation group. Note, each SwitchPort has a foreign key relationship to a NetworkSwitch. In other words, each SwitchPort is tied to a specific NetworkSwitch.
Now in our example, the vEOS switches have seven Ethernet ports (Ethernet1 - Ethernet7); consequently, I will create seven SwitchPort entries for each of the Arista switches.
Generating and Loading the Database
The database has now been defined in the Django models.py file. The next step is to generate the database using Django's manage.py:
$ python manage.py makemigrations net_system
No changes detected in app 'net_system'

$ python manage.py migrate
Operations to perform:
  Apply all migrations: admin, contenttypes, net_system, auth, sessions
Running migrations:
  Applying contenttypes.0001_initial... OK
  Applying auth.0001_initial... OK
  Applying admin.0001_initial... OK
  Applying net_system.0001_initial... OK
  Applying net_system.0002_auto_20151030_1529... OK
  Applying net_system.0003_auto_20151030_1530... OK
  Applying net_system.0004_auto_20151030_1908... OK
  Applying net_system.0005_auto_20151031_1054... OK
  Applying net_system.0006_auto_20151103_1450... OK
  Applying net_system.0007_networkswitch_management_ip... OK
  Applying net_system.0008_auto_20151105_1548... OK
  Applying sessions.0001_initial... OK
This creates a database structure matching the definitions that we specified. Note, I am using sqlite3 for the database (SQLite is a file based database so the entire database is stored in a single file). You could use a more full-featured database like MySQL or PostgreSQL. The process would be similar except there would be a set of additional database administration tasks that you would need to complete.
At this point we have a database structure defined, but none of our data is loaded.
In order to load the data into the database, I have created two Python scripts.
The first script 'load_devices.py' loads the NetworkSwitches, the InventoryGroups, and the Credentials. It also establishes the relationships between these objects. Note, the NetworkSwitch objects have distinct 'management_ip' and 'ip_address' fields. This is because my Django database resides on an AWS server and communicates to the Arista switches via a NAT (in other words the 'management_ip' is the NAT'd IP address that I would use to SSH to the switches from the AWS server).
$ python load_devices.py
Please enter IP address: 1.1.1.1
Password:
(<InventoryGroup: arista>, True)
(<Credentials: admin1>, True)
(<NetworkSwitch: pynet-sw1>, True)
(<NetworkSwitch: pynet-sw2>, True)
(<NetworkSwitch: pynet-sw3>, True)
(<NetworkSwitch: pynet-sw4>, True)
Now that the NetworkSwitch objects have been loaded, the next step is to load all of the SwitchPort definitions. My script for this is called load_ports.py.
$ python load_ports.py
Creating Switch1 port objects
Creating Switch2 port objects
Creating Switch3 port objects
Creating Switch4 port objects
Note, loading the 4 switches and 28 total switchports required about about 150 lines of code. Obviously, there is a certain amount of code required just to specify the switch and switchport attributes.
At this point we have our database entirely loaded.
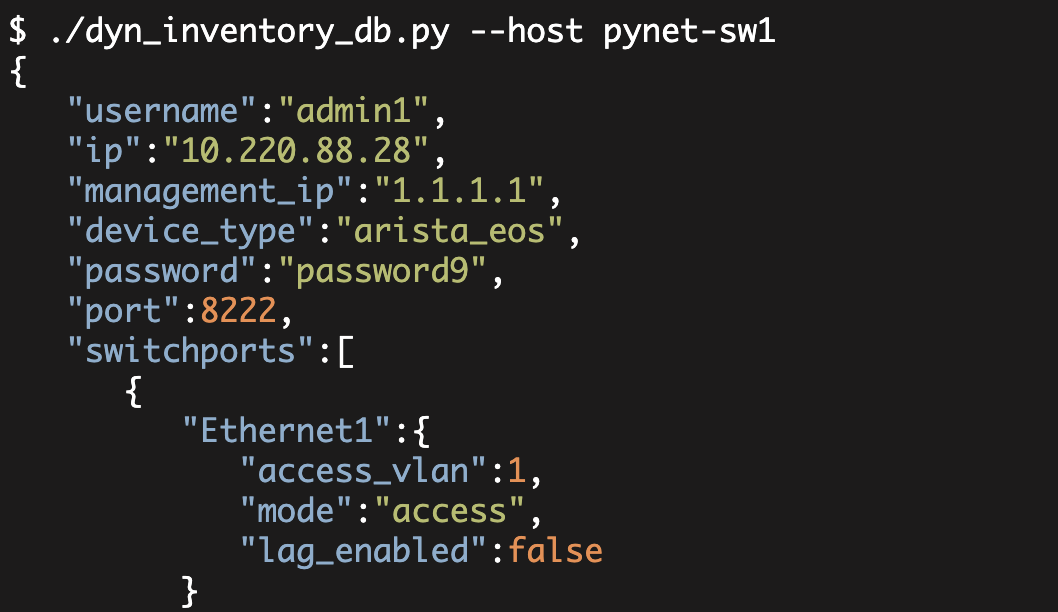
We have four Arista switches in the database with credentials. Additionally, we have defined all of the switchports. The next step will be to create a script that pulls some of this information from the database and presents it to Ansible (Ansible dynamic inventory). Using this information and a template, we will generate the switch configurations dynamically. I cover these items in Part2.
Kirk Byers
You might also be interested in:
-

Ansible
Ansible and Dynamic Inventory
So you are chugging along using Ansible, but are having problems maintaining your Ansible inventory.
-
Ansible
Ansible Configuration Templating using a Database Part2
In the last article I created database models representing network switches, switchports, and credentials (including the relationships between these models).
-
Ansible
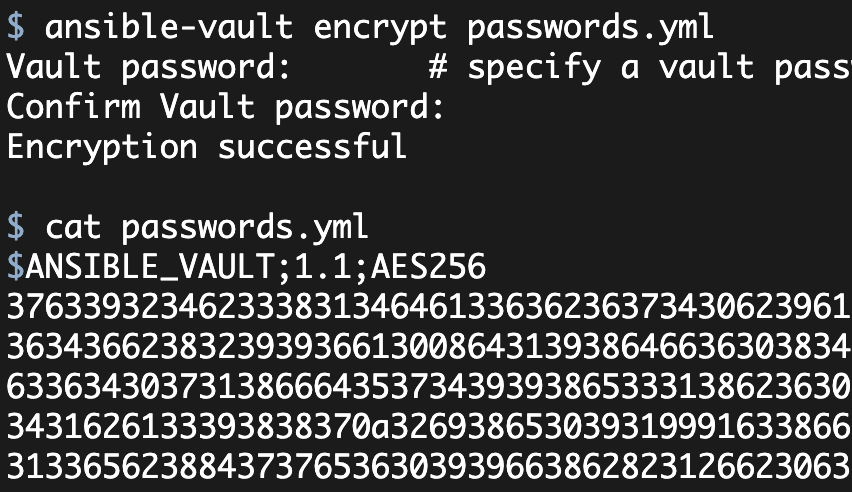
Encrypting passwords using Ansible Vault
You are not happy about having your passwords sitting in the clear inside your Ansible files; you really would like these files to be encrypted.