Configuring Arista Switches
with Ansible, Part 2 of 3
Last week I walked you through preparing an Arista switch for use with Ansible (Part 1). This week I will show you how to use Ansible to make changes to your Arista switch.
First some background on Ansible, Ansible is a configuration management application that runs on Unix variants. It is clientless and uses SSH for its transport. With Ansible, you specify a certain state that you want achieved on a set of remote hosts. As a simple example, you want a certain switch interface to be in an admin up state and to be assigned to VLAN100. In addition to remote hosts, Ansible can also take actions via APIs (for example, you can create AWS EC2 instances). In general, Ansible accomplishes its actions by using SSH to transfer Python modules to the remote hosts and by executing these modules on the remote hosts. For additional information, Ansible has good documentation located at https://docs.ansible.com/ansible_community.html
To get going with Ansible, you first install it; you then proceed to define an inventory. An inventory is a set of hosts organized by groups and potentially with other attributes. The Ansible inventory file by default is located at /etc/ansible/hosts.
Here is the simple inventory file for my test environment:
$ cat /etc/ansible/hosts
[local]
localhost

[arista]
arista-sw1 ansible_ssh_host=172.16.64.11 ansible_ssh_user=ansible
#arista-sw2 ansible_ssh_host=172.16.64.12 ansible_ssh_user=ansible
As a reminder from last week—my laptop is located at 172.16.64.1; my virtual Linux machine is at 172.16.64.2 (Ansible server); and my Arista virtual switch is located at 172.16.64.11/24 (management interface).
The square brackets in the inventory file define groups
You can now test your communication between the Ansible server and the Arista virtual switch.
$ ansible arista -m ping
arista-sw1 | success >> {
    "changed": false,
    "ping": "pong"
}
You now know that your communication between Ansible and the Arista switch is working (the SSH trust is setup correctly and that Ansible can transfer a module to and execute a module on, the remote host)
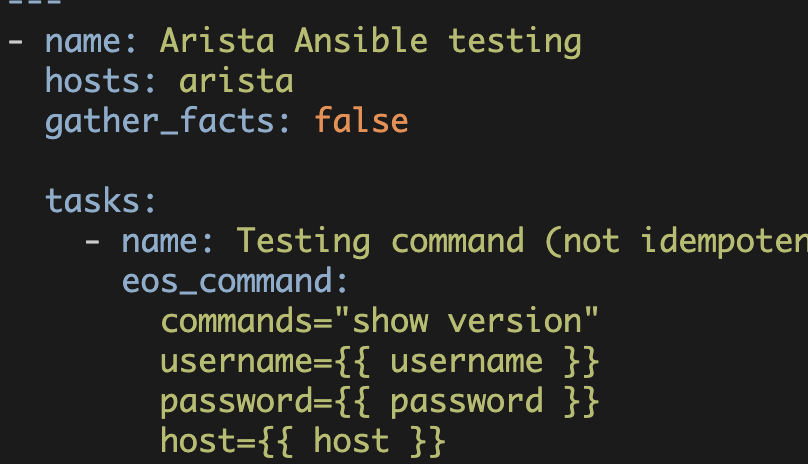
Now you need to create an Ansible playbook—this is where you define the state that you want to achieve on the Arista switch. An Ansible playbook is specified in YAML. AnsibleWorks has a brief introduction to YAML at YAMLSyntax.html.
The below playbook ensures that interfaces Ethernet1-4 are in an admin up state and that a certain description exists on interface Ethernet1
---
- hosts: arista
  tasks:
  - name: "enable interface Ethernet 1-4"
    arista_interface: interface_id={{ item }} admin=up
    with_items:
    - Ethernet1
    - Ethernet2
    - Ethernet3
    - Ethernet4

  - name: "set description on Ethernet 1"
    arista_interface: interface_id=Ethernet1 description='Test description'
One item to note—with_items and {{ item }} create a simple loop (where each member of with_items is used as an interface_id in the arista_interface module)
You can now execute this playbook on the Arista switch. The below output shows the switch configuration with the interfaces starting in a shutdown state (note, I stripped some immaterial items from the output):
arista-sw1#show run
!
hostname arista-sw1
!
spanning-tree mode mstp
!
!
interface Ethernet1
   shutdown
!
interface Ethernet2
   shutdown
!
interface Ethernet3
   shutdown
!
interface Ethernet4
   shutdown
!
interface Management1
   ip address 172.16.64.11/24
!
ip route 0.0.0.0/0 172.16.64.1
!
ip routing
!
management api http-commands
   no protocol https
   protocol http
   no shutdown
!
!
end
You can then execute the playbook using 'ansible-playbook interface.yml --module-path=../modules/':
$ ansible-playbook interface.yml --module-path=../modules/

PLAY [arista] *****************************************************************

GATHERING FACTS ***************************************************************
ok: [arista-sw1]

TASK: [enable interface Ethernet 1-4] *****************************************
changed: [arista-sw1] => (item=Ethernet1)
changed: [arista-sw1] => (item=Ethernet2)
changed: [arista-sw1] => (item=Ethernet3)
changed: [arista-sw1] => (item=Ethernet4)

TASK: [set description on Ethernet 1] *****************************************
changed: [arista-sw1]

PLAY RECAP ********************************************************************
arista-sw1                 : ok=3    changed=2    unreachable=0    failed=0
You need to add the --module-path option to use the new Arista-Ansible modules (the Arista modules included with Ansible 1.3 are not compatiable with the Arista Devops Extension that was installed in Part1 of this blog series). This option will become unnecessary when the new Arista modules are included in Ansible.
The ../modules/ directory is as follows:
$ ls -al ../modules/
total 88
drwxrwxr-x.  2 ansible ansible  4096 Nov  6 11:18 .
drwx------. 10 ansible ansible  4096 Nov  8 20:01 ..
-rw-rw-r--.  1 ansible ansible  7926 Nov  6 00:18 arista_interface
-rw-rw-r--.  1 ansible ansible 12757 Nov  6 11:18 arista_switchport
-rw-rw-r--.  1 ansible ansible 10108 Nov  6 06:49 arista_vlan
These Arista-Ansible modules are on Github here.
After executing the interface.yml playbook, the switch configuration now looks as follows:
interface Ethernet1
   description Test description
!
interface Ethernet2
!
interface Ethernet3
!
interface Ethernet4
!
The interfaces are no longer shutdown and Ethernet1's description has been configured.
One important characteristic of Ansible and other similar configuration management applications is that they are generally idempotent. This means that Ansible will only change something if it needs to be changed to reach the specfied state. In other words, if the given thing is already in the right state then no change command will be executed. Consequently, if you re-execute the Ansible playbook, no changes will be made.
$ ansible-playbook interface.yml --module-path=../modules/

PLAY [arista] *****************************************************************

GATHERING FACTS ***************************************************************
ok: [arista-sw1]

TASK: [enable interface Ethernet 1-4] *****************************************
ok: [arista-sw1] => (item=Ethernet1)
ok: [arista-sw1] => (item=Ethernet2)
ok: [arista-sw1] => (item=Ethernet3)
ok: [arista-sw1] => (item=Ethernet4)

TASK: [set description on Ethernet 1] *****************************************
ok: [arista-sw1]

PLAY RECAP ********************************************************************
arista-sw1                 : ok=3    changed=0    unreachable=0    failed=0
After you have executed the first playbook, you can then create a second more complicated playbook. Here is a playbook that creates three VLANs; sets up Ethernet1-3 for trunking; configures the native VLAN on Ethernet1 to the blue VLAN; change the 'allowed vlans' on Ethernet2 to default and blue (note 'tagged_vlans' is a misnomer it is actually allowed vlans); and converts Ethernet4 to a routed port ('no switchport').
$ cat switchport.yml
---
- hosts: arista
  tasks:
  - name: create vlan blue
    arista_vlan: state=present vlan_id=100 name=blue

  - name: create vlan red
    arista_vlan: state=present vlan_id=200 name=red

  - name: create vlan green
    arista_vlan: state=present vlan_id=300 name=green

  - name: create trunk on Ethernet1-3
    arista_switchport: interface_id= vlan_tagging=enable
    with_items:
    - Ethernet1
    - Ethernet2
    - Ethernet3

  - name: change native vlan on Ethernet1
    arista_switchport: interface_id=Ethernet1 untagged_vlan=blue

  - name: change vlans allowed on trunk on Ethernet2
    arista_switchport: interface_id=Ethernet2 tagged_vlans=default,blue

  - name: disable 'switchport' on Ethernet4
    arista_switchport: interface_id=Ethernet4 state=absent
Running this playbook yields:
$ ansible-playbook switchport.yml --module-path=../modules/

PLAY [arista] *****************************************************************

GATHERING FACTS ***************************************************************
ok: [arista-sw1]

TASK: [create vlan blue] ******************************************************
changed: [arista-sw1]

TASK: [create vlan red] *******************************************************
changed: [arista-sw1]

TASK: [create vlan green] *****************************************************
changed: [arista-sw1]

TASK: [create trunk on Ethernet1-3] *******************************************
changed: [arista-sw1] => (item=Ethernet1)
changed: [arista-sw1] => (item=Ethernet2)
changed: [arista-sw1] => (item=Ethernet3)

TASK: [change native vlan on Ethernet1] ***************************************
changed: [arista-sw1]

TASK: [change vlans allowed on trunk on Ethernet2] ****************************
changed: [arista-sw1]

TASK: [disable 'switchport' on Ethernet4] *************************************
changed: [arista-sw1]

PLAY RECAP ********************************************************************
arista-sw1                 : ok=8    changed=7    unreachable=0    failed=0
Your switch should now show the following in its configuration:
vlan 100
   name blue
!
vlan 200
   name red
!
vlan 300
   name green
!
interface Ethernet1
   description Test description
   switchport trunk native vlan 100
   switchport mode trunk
!
interface Ethernet2
   switchport trunk allowed vlan 1,100
   switchport mode trunk
!
interface Ethernet3
   switchport mode trunk
!
interface Ethernet4
   no switchport
A few final comments about the Arista-Ansible modules and the Arista Devops Extension. Arista told me in advance that the code that they provided me was test/demo/eval code only. This was definitely the case; the code was not production ready and had several significant problems.
I had to work around these issues in order to get the playbooks to operate correctly. I did this by making modifications to the Arista-Ansible modules. That being said, Arista was very helpful in assisting me, and they did tell me in advance that the code was test-only code.
Additionally, the Arista-Ansible modules are open source and up on Github—so they are available to be tested and improved upon. Arista also stated that they were going to open source the Devops Extension. At that point all the relevant code will be open source.
This blog post covered using Ansible to make changes to Arista switches. I will have a short Part3 blog post where I will discuss things that I learned troubleshooting the Ansible-Arista system (update 2014-01-30: here is Part3).
Kirk Byers
You might also be interested in:
-
Ansible
Configuring Arista Switches with Ansible (Part1)
I recently created a Meetup group in San Francisco named 'SF Network Automation'and gave the initial talk on, 'Network Automation using Ansible and Puppet'.
-
Ansible
Configuring Arista Switches with Ansible (Part3)
This article is part three of my series on Configuring Arista Switches using Ansible.
-
Ansible
Arista and Ansible using pyeapi
Arista recently created a library called pyeapi and they have integrated this library into their Ansible modules. pyeapi itself is fairly staightforward to use.