IOS-XE and NETCONF Candidate
Configuration Testing, Part1
At some point in the relatively recent past, Cisco added candidate configuration support into Cisco's IOS-XE NETCONF implementation.
Since having a candidate configuration can improve configuration automation, I became interested in testing this IOS-XE candidate configuration feature.
Consequently, I started up a CSR1000V running IOS-XE version 16.09.08 in AWS. I also configured the following items on the router:
netconf-yang
netconf-yang feature candidate-datastore
NETCONF
In this article, I am going to assume you already know a few things about NETCONF and I am only going to cover NETCONF in a very cursory manner.
At a very high-level, with NETCONF we are communicating to our network device using a standardized API (rfc6241).
This standardized API has various layers including an SSH transport (typically), XML-encoded RPC operations, and XML-encoded configuration and response data. NETCONF also has support for notifications which I am not going to discuss here.
The remote RPC operations include: get, get-config, edit-config (and a few others). Basically, you call a remote function on the device (with your request structured a certain way) and the device returns operational data ("get"), configuration data ("get-config"), or lets you change the configuration ("edit-config").
NETCONF also lets you perform certain operations on configuration datastores (for example, "edit-config"). The configuration datastores that you typically specify are: <running>, <startup>, and <candidate>. Both the startup and the candidate datastore may or may not be supported by the device (as listed in the device's NETCONF capabilities). The running datastore must always be present.
As mentioned above, the device's configuration (in the case of the "edit-config" operation) will be transported inside a RPC operation and will be represented in XML.
As a further layer of complexity the device's XML configuration also has certain models that define its proper structure. In other words, there are models that define what the configuration should look like. These models are known as YANG models. In this article, I am not going to discuss YANG models.
For additional technical details on NETCONF, see NETCONF (Wikipedia) and NETCONF article (from Huawei).
Getting Started
Now back to our original objective—how can we use this IOS-XE candidate configuration feature? Let's start by establishing a simple NETCONF connection and look at the device's NETCONF capabilities.
import os
from ncclient import manager
from rich import print

if __name__ == "__main__":

    device = {
        "host": "x.x.x.166",
        "port": 830,
        "username": "admin",
        "password": "bogus",
        "hostkey_verify": False,
    }
    device["password"] = os.environ["PYNET_PASSWORD"]

    with manager.connect(**device) as nconf:
        print(list(nconf.server_capabilities))
And executing this yields:
$ python capabilities1.py
[
    'urn:ietf:params:netconf:base:1.0',
    'urn:ietf:params:netconf:base:1.1',
    'urn:ietf:params:netconf:capability:candidate:1.0',
    'urn:ietf:params:netconf:capability:xpath:1.0',
    'urn:ietf:params:netconf:capability:validate:1.0',
    'urn:ietf:params:netconf:capability:validate:1.1',
    'urn:ietf:params:netconf:capability:rollback-on-error:1.0',
    'urn:ietf:params:netconf:capability:notification:1.0',
    ...
    # large number of additional lines
A key line we see in this output is the following:
urn:ietf:params:netconf:capability:candidate:1.0 So we have both a working NETCONF connection and we have verified this device supports the candidate configuration NETCONF feature.
Configuring a Loopback
Now let's try to use this candidate configuration feature to actually configure something.
Namely, let's add a loopback interface to this device using the candidate configuration (and ultimately committing the candidate-config to the running-config).
Now the tricky part is, "how do we work out what the configuration should look like?".
We know from our earlier discussion that the configuration will be represented as XML, but, "What the heck does that XML look like" and how do we even work this out?
The easiest way to determine the required XML is to configure the loopback manually using the CLI and then compare the full XML configuration before and after this.
In other words, NETCONF provides a remote operation named <get-config> and we can use this remote operation to see how the configuration changes when we add a loopback interface.
Now in a certain sense this isn't very satisfying as we have to use the CLI to work out how to properly structure the data to present to the API, but realistically I don't see a better or easier way to accomplish this. Additionally, once we have worked out the XML format for the loopback we can generalize it and reuse it again later.
Grabbing the XML Configuration
How do we grab the running configuration using NETCONF?
From looking at online examples for the ncclient library we can determine that the format of the get-config call will be similar to the following (note, ncclient is the Python NETCONF library that I will be using in all of my examples).
    # imports and "device" definition omitted
    with manager.connect(**device) as nconf:
        nc_reply = nconf.get_config(source="running")
        print(type(nc_reply))
If we execute this program, we see that the nc_reply object is of type "GetReply":
<class 'ncclient.operations.retrieve.GetReply'>And we can access the 'data_ele' attribute of this GetReply object. This will give me the XML root element of this reply data.
(Pdbr) nc_reply.data_ele
<Element {urn:ietf:params:xml:ns:netconf:base:1.0}data at 0x7f61652e8380>
We can then use the lxml library to convert this element to a (somewhat) readable XML string.
    with manager.connect(**device) as nconf:
        nc_reply = nconf.get_config(source="running")
        xml_data = etree.tostring(
            nc_reply.data_ele,
            pretty_print=True
        ).decode()
        print(xml_data)
And executing this yields:
<data xmlns="urn:ietf:params:xml:ns:netconf:base:1.0"
      xmlns:nc="urn:ietf:params:xml:ns:netconf:base:1.0">
  <native xmlns="http://cisco.com/ns/yang/Cisco-IOS-XE-native">
    <version>16.9</version>
    <boot-start-marker/>
    <boot-end-marker/>
    <service>
      <password-encryption/>
      <timestamps>
         <debug>
            <datetime>
      # Rest of the configuration in XML format
We can then use Python to write this XML configuration out to a file.
Now let's use the CLI to manually add a loopback interface to the router.
cisco7(config)#interface Loopback 99
cisco7(config-if)#end
We once again save this configuration and then compare the XML configuration before and after.
$ git diff running.xml
diff --git a/netconf_iosxe_candidate/get_config/running.xml b/netconf_iosxe_candidate/get_config/running.xml
index aad9418..5d7e32d 100644
--- a/netconf_iosxe_candidate/get_config/running.xml
+++ b/netconf_iosxe_candidate/get_config/running.xml
@@ -166,6 +166,9 @@
           <auto>true</auto>
         </negotiation>
       </GigabitEthernet>
+      <Loopback>
+        <name>99</name>
+      </Loopback>
       <VirtualPortGroup>
         <name>0</name>
         <vrf>
@@ -lt;342,6 +345,28 @@
         </config>
       </ethernet>
     </interface>
+    <interface>
+      <name>Loopback99</name>
+      <config>
+        <name>Loopback99</name>
+        <type xmlns:ianaift="urn:ietf:params:xml:ns:yang:iana-if-type">ianaift:softwareLoopback</type>
+        <enabled>true</enabled>
+      </config>
+      <subinterfaces>
+        <subinterface>
+          <index>0</index>
+          <config>
+            <index>0</index>
+            <enabled>true</enabled>
+          </config>
+          <ipv6 xmlns="http://openconfig.net/yang/interfaces/ip">
+            <config>
+              <enabled>false</enabled>
+            </config>
+          </ipv6>
+        </subinterface>
+      </subinterfaces>
+    </interface>
     <interface>
       <name>VirtualPortGroup0</name>
       <config>
@@ -lt;519,6 +544,13 @@
       <ipv4 xmlns="urn:ietf:params:xml:ns:yang:ietf-ip"/>
       <ipv6 xmlns="urn:ietf:params:xml:ns:yang:ietf-ip"/>
     </interface>
+    <lt;interface>
+      <name>Loopback99</name>
+      <type xmlns:ianaift="urn:ietf:params:xml:ns:yang:iana-if-type">ianaift:softwareLoopback</type>
+      <enabled>true</enabled>
+      <ipv4 xmlns="urn:ietf:params:xml:ns:yang:ietf-ip"/>
+      <ipv6 xmlns="urn:ietf:params:xml:ns:yang:ietf-ip"/>
+    </interface>
     <interface>
       <name>VirtualPortGroup0</name>
       <type xmlns:ianaift="urn:ietf:params:xml:ns:yang:iana-if-type">ianaift:propVirtual</type>
We can see that we added three different configuration sections to the XML tree.
If we search through the full XML file, we can determine each of the relevant namespaces (XML Config File).
At the end of this process, we have an XML representation of the configuration that was added for the loopback interface (see Loopback Config).
One additional item to note is I needed to change the very highest level XML tag from being a <data> tag (see here) to being a <config> tag (see here).
Can we finally configure this loopback already?
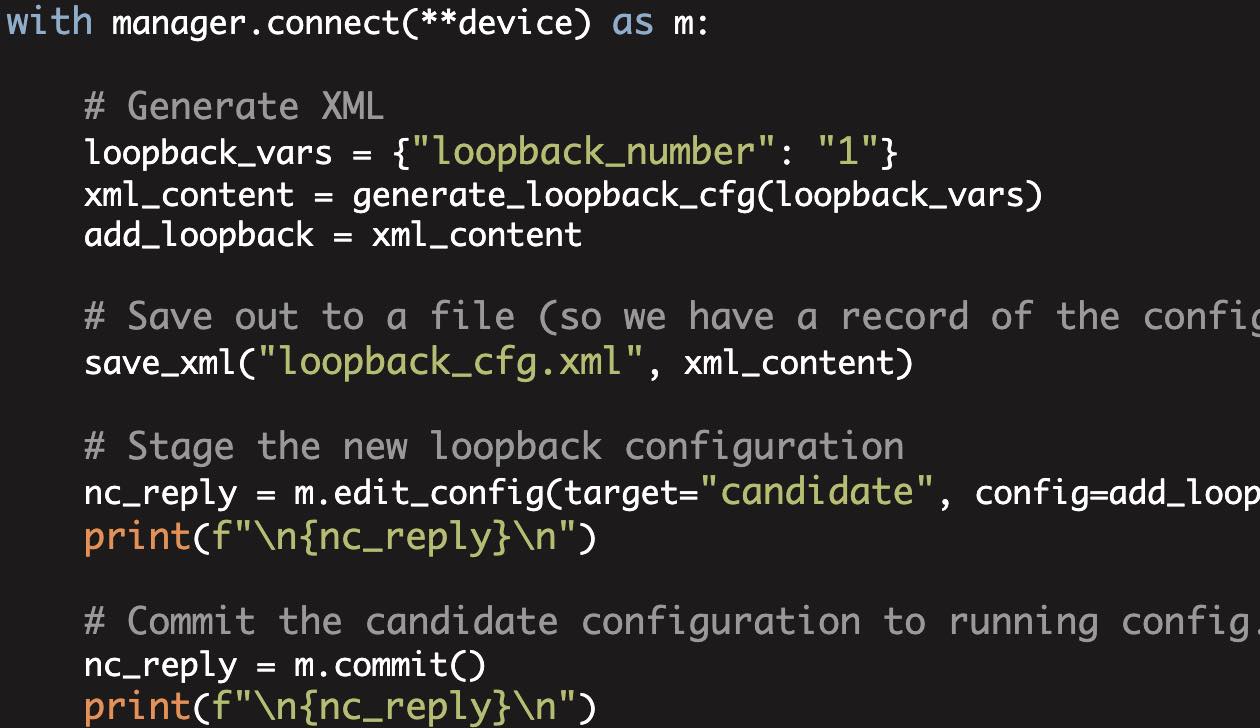
Now that we have the XML configuration that we need, let's use ncclient to configure this interface using NETCONF (and also use the candidate configuration in the process).
import os
from lxml import etree  # noqa
from ncclient import manager
from rich import print
import pdbr  # noqa


if __name__ == "__main__":

    device = {
        "host": "x.x.x.166",
        "port": 830,
        "username": "admin",
        "password": "bogus",
        "hostkey_verify": False,
    }

    device["password"] = os.environ["PYNET_PASSWORD"]

    with manager.connect(**device) as m:

        # Read the Loopback XML CFG from a file
        filename = "loopback_cfg.xml"
        with open(filename) as f:
            add_loopback = f.read()

        # Stage the new loopback in the candidate config
        nc_reply = m.edit_config(target="candidate", config=add_loopback)
        print(f"\n{nc_reply}\n")

        # Commit the candidate config to running
        nc_reply = m.commit()
        print(f"\n{nc_reply}\n")
If we then look at the current interfaces on the device (note, I manually removed the loopback interface that we configured via the CLI).
$ netmiko-show --cmd "show ip int brief" cisco7

// No Loopback in the config
Interface         IP-Address      OK? Method Status Protocol
GigabitEthernet1  172.26.1.41     YES DHCP   up     up
VirtualPortGroup0 192.168.35.101  YES other  up     up
And then we execute our NETCONF configuration script:
$ python cfg_loopback.py

<!-- I formatted the XML to make it more readable -->
<?xml version="1.0" encoding="UTF-8"?>
<rpc-reply
 xmlns="urn:ietf:params:xml:ns:netconf:base:1.0"
 message-id="urn:uuid:780c9f83-c621-4d52-9547-b0b5029c139e"
 xmlns:nc="urn:ietf:params:xml:ns:netconf:base:1.0">
   <ok/>
</rpc-reply>

<?xml version="1.0" encoding="UTF-8"?>
<rpc-reply
 xmlns="urn:ietf:params:xml:ns:netconf:base:1.0"
 message-id="urn:uuid:639781a0-d546-4d79-b2c9-1bdf461210d8"
 xmlns:nc="urn:ietf:params:xml:ns:netconf:base:1.0">
   <ok/>
</rpc-reply>
And then finally, we look at the interfaces now present on the device:
$ netmiko-show --cmd "show ip int brief" cisco7
// Look at that beautiful loopback interface.
Interface         IP-Address      OK? Method Status Protocol
GigabitEthernet1  172.26.1.41     YES DHCP   up     up
Loopback99        unassigned      YES unset  up     up
VirtualPortGroup0 192.168.35.101  YES other  up     up
We can see from this that we successfully added the Loopback99 interface using the candidate configuration and that we committed that change into the running-config.
Wrapping Up
In order to get a working example, there are several things that I have not done (which I probably should do). These include: locking the config, validating the config (before committing), verifying the responses back from the device (i.e. checking each step of the process), and finally saving the config change into startup-config.
Finally our XML configuration is currently hard-coded to a particular interface (Loopback99) and we should abstract this configuration to allow us to configure any loopback interface.
But Rome wasn't built in a day so I am going to leave it here for now.
Reference code used in this article is here
Kirk Byers
You might also be interested in:
-
NETCONF
NETCONF: Abstract the Abstraction
Now I want to keep the XML configuration file in an external file and we want to abstract away the hard-coding of the loopback.
-
Netmiko
Netmiko4: ConnLogOnly
ConnLogOnly is a replacement for ConnectHandler and operates similarly.
-
Netmiko
Netmiko4: send_command_timing
Netmiko has two fundamental ways for gathering show output: send_command() and send_command_timing(). send_command_timing() is an entirely timing based solution.